Many report areas will display the Report Options screen for you to select your report options.
For example, this is the Mailing Labels Report Options screen:
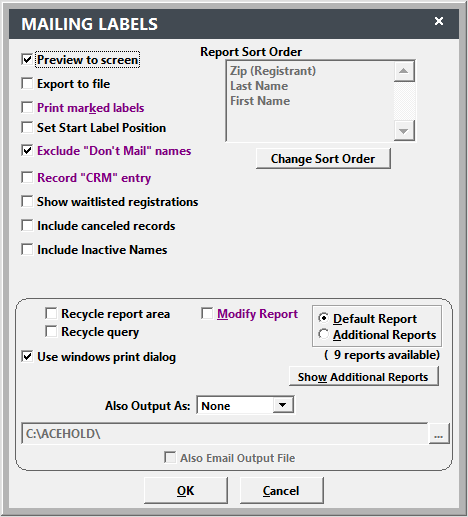
Most report options are available in all report areas, such as Print to screen and Modify report. Some are only available in certain report areas, e.g. Show Waitlisted Registrations is only available in report areas accessing registration information.
Here a brief description of the available options:
- Print to screen – check to see an on-screen preview of the report before sending it to the printer.
- Export to file – check to export the data in the report to an external file (i.e. Microsoft Excel, Text file, etc.).
- Print New Invoices (Invoices > Run Invoices Only) – if checked, will print invoices for all billing records which have not yet been assigned an invoice number (must have Company Invoicing module).
- Print Marked Labels (Demographics > Mailing Labels Only) – if checked, all Name records which have the Print Label checked are included in your report. Note: you aren't given the opportunity to run a query if you select this option.
- Set Start Label Position (Demographics > Mailing Labels, Registrations > Nametags) - allows you to print on a partially used label/name tag sheet. If checked, the system will ask you to specify on which label/name tag the system should start printing.
- Exclude "Don't Mail" Names (Demographics > Mailing Labels Only) – if checked, will not include any Name record which has the Don't Mail box checked.
- Record "CRM" Entry (Demographics > Mailing Labels and Registrations > Receipts) – if checked, after the report runs, you'll be given the opportunity to create a CRM entry for all Name records in the report (must have optional CRM Module).
- Report Sort Order (Various Report Areas) – allows you to change the sort order for records included in report (e.g. change sort order of mailing labels from Zip+Last Name+First Name to State+Last Name+First Name). CAUTION: you may receive unexpected results because report grouping and justdoit functions will override your sort order options.
- Show Waitlisted Registrations (Registration Reports Only) – check to include waitlisted registrations in your report.
- Include canceled records – check to include canceled records in your report (i.e. canceled courses, registrations, etc.).
- Include Inactive Records - in Mailing Labels and Names w/Codes, check to include inactive Name records.
- E-mail Separately? (Certificates, Faculty Contracts, Invoices, Transcripts) Email module users only - if checked, the system will create individual pdf files and email them to the individuals in the report (e.g. email certificate to individuals in a course, email faculty contract to the instructor, email invoice to the payer).
- Include Third Party Billing Reggies – check to include registrations marked as billing records in your report.
- Generate Individual PDFs - in Receipts and Transcripts area. If checked, will generate individual PDF transcripts for all users in the report.
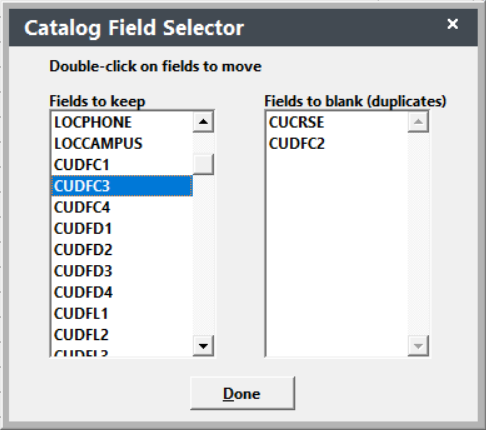
- Clear Selected Fields from cursor (Catalog Copy) - in Courses > Generate Catalog Copy area only. If checked, adds an additional step to select fields you want to keep in the report cursor.
- Recycle Report Area – if checked, you’ll be returned to the report area’s Report Options screen after running the report. This is useful when you need to run a series of reports in the same area.
- Recycle Query – if checked, you’ll be able to run reports in this report area with the same query. Once, again, this is useful when you need to run a series of reports in the same area and using the same criteria (e.g. courses between two dates).
- Also Output As (HTML or PDF) – export the report as an HTML page or as a PDF file. Note: if no name is entered, the system will use the User Name and a random number, e.g. ACE0293.
- Modify Report – check to modify the report. For more information, see next section.
- Default Report/Additional Reports – select the report you want to run.
- Show User Reports – click this button to see the list of additional reports in this reporting area.
- Use Windows Print Dialog – this option opens the standard Windows Print Dialog box when you print the report. You can then select the printer and printer options (i.e. number of copies, pages to print, etc.). If you don't select this option, the report will automatically be sent to the default printer when you print the report.
Note: if you want to send the report directly to the default printer and also want to print multiple copies, uncheck the box then enter the number of copies in the Number of Copies field.
To run the report, select the appropriate options then click the OK button. The Query List Manager now opens (unless you selected the Print Marked Labels or New Invoices options).